3 Steps to Set Up Your Company Page on WIN

The WIN marketing platform shares traits with other content marketing solutions like social media networks and blogging platforms, but it is a wine industry specific marketing tool with unique and powerful features, so we want to make sure you understand the fundamentals so you can get the most out of it.
Below are 3 steps to get you off to a strong start and build a foundation for success. If you have questions about any of the steps, you can always reach out to your WIN account manager who is here to support you.
1. Login and Admin Access
The first step is to decide who on your team will be managing your WIN Company Page. It can be multiple people, but each person involved should create their own WIN login. When your logins have been created, your WIN Account Manager will assign admin access to your company page to each login and schedule a Zoom meeting with your team.
During the Zoom meeting, your WIN Account Manager will go over the next two steps and how to edit and post to your company page.
This is also an opportunity for you to tell your WIN Account Manager about your company and marketing objectives, so that they get a better understanding of how they can help you get the most out of your WIN membership.
2. Company Page Basics
At the outset, your WIN Company Page is hidden from public view so that you can make sure it has all the correct information that you want to share. Once the basic information has been added, your WIN Account Manager will make the page public. Before your page has been made public, it will not show up in search results, and your posts will not appear in the newsfeed or newsletter.
There are three areas that you should complete before making the page public.
Header Section: The top section of your company page is the Header Section and includes your logo, general contact information, and links to social media pages. To edit this section, click on the pencil icon in the top right corner, then a modal window will appear where you can edit the fields.
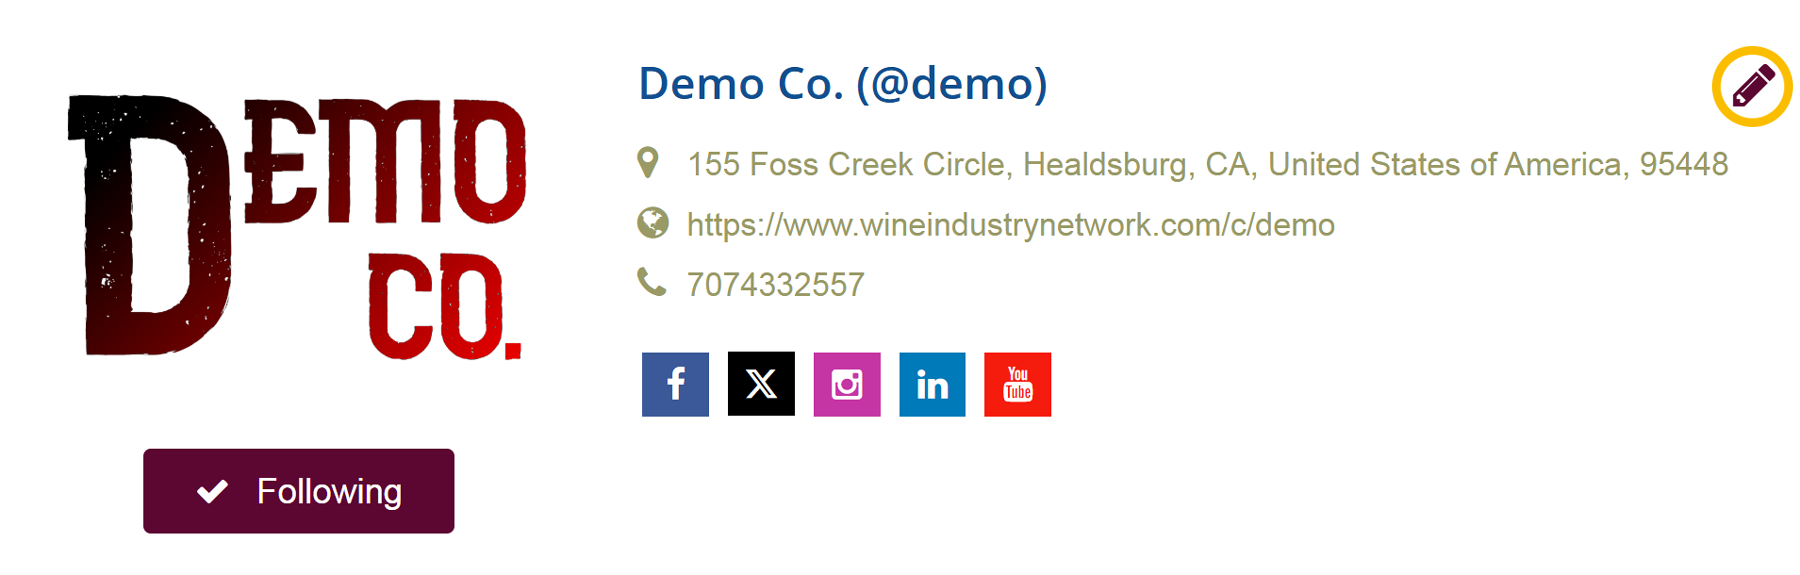
Note that at the bottom of this modal window is a section for keywords. These keywords don’t appear anywhere on the company page, but they help ensure that your company page shows up in the relevant search results. In this field you should add the relevant keywords that you want your company to show up for in searches. Keywords need to be comma separated, but you can add as many keywords as are relevant to your company.
When the header section information has been completed, click the submit button at the bottom of the modal window before closing the window.
About Section: The second tab on your company page is the About Section. When you click the edit button, a full WYSIWYG editor appears, which allows you to add text, links, images and embedded videos. The editor provides styling options that don’t require any coding knowledge, but you can also enter code view and edit the section’s html/css code.
The purpose of this section is to introduce your company to people that don’t know it, so put your best foot forward and include both text and visual elements as well as links to more information on your website. You don’t have to explain everything about your company here, just enough for visitors to get an understanding of who you are and what you do.
Once you’ve added the content you want, click the save button at the bottom before moving on.
Contact Information: The third tab on your company page is the Contact Section. This section includes a contact form that visitors can use to contact you, as well as lists of individual contacts at your company and locations. You can add individual contacts by clicking on the pencil icon and filling in the contact fields. The same goes for adding additional locations.
To set the email address that contact form submissions are sent to, go to the Admin Center and click on Notifications. Here you can set the contact email address. You can add multiple notification recipients by comma separating additional email addresses.
When you have completed the Company Page Basics, let your WIN Account Manager know that they can make the page public, and then you’ll be ready to start posting your content into the WIN news stream.
3. Start Posting
Posting content on your WIN company page is the most important part of the process, because the content you post is pushed into the newsfeed and included in the bi-weekly Product & Service Newsletter (PS News), which is sent to thousands of wine industry professionals. This is your opportunity to leverage the reach of the WIN platform to reach new potential customers.
How to Post
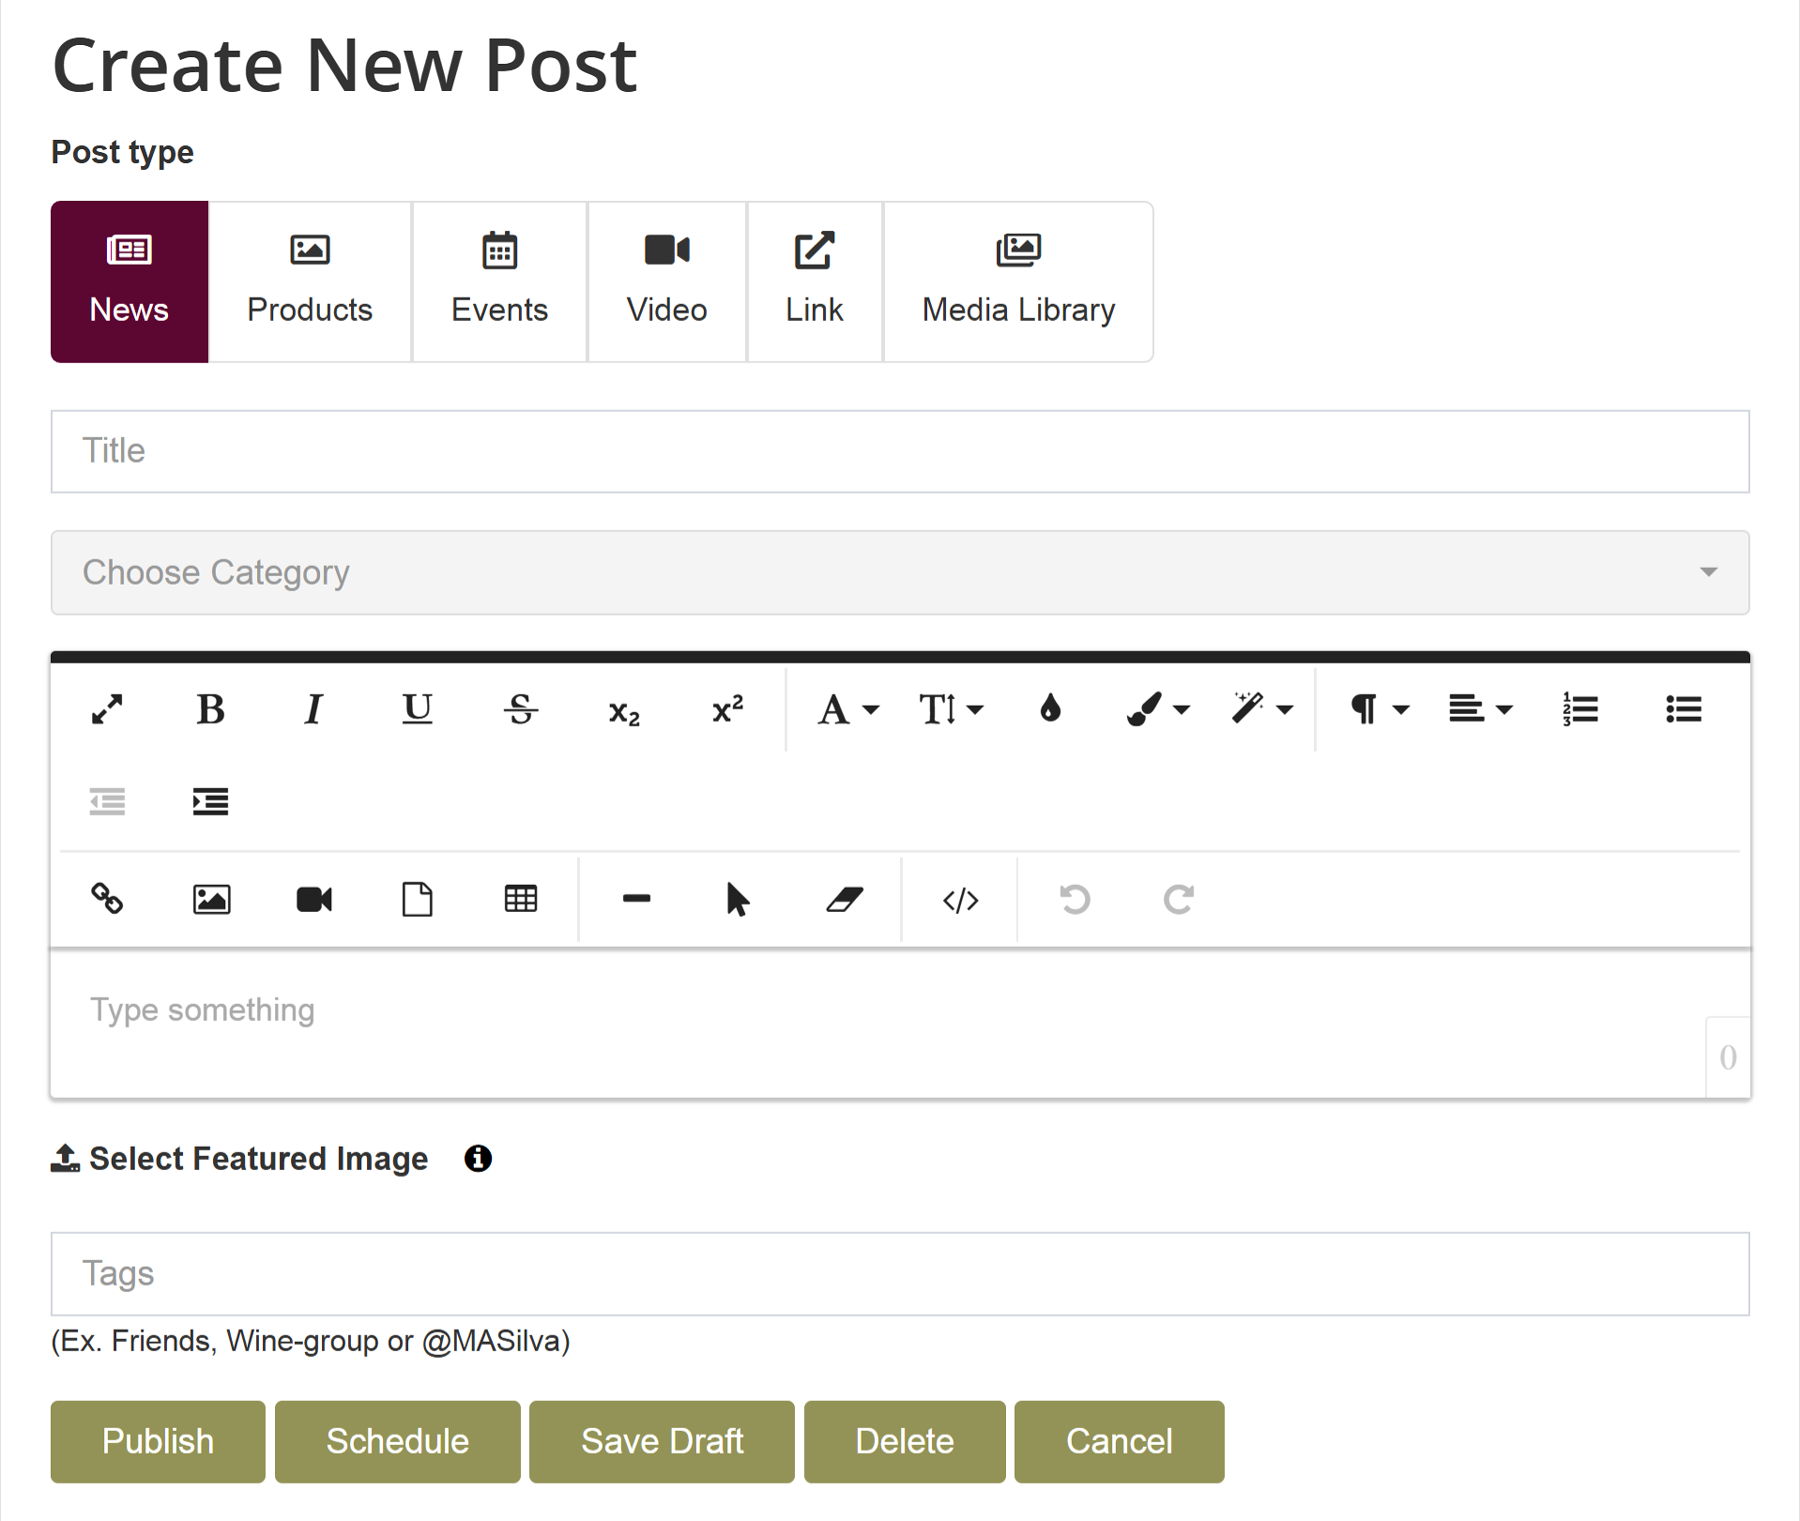
The first tab on your company page is the Feeds Section. Click the Create New Post button to get started. You will see a few different post type options, but in most cases, the default News post is the one you should use.
Title: The title of your post is the most important element in determining the success of the post. The title is what people use to decide whether to click and read your full post, so make it short and enticing, while also being true to the content of your post.
Category Selector: The category selector is the second most important field. The categories you select from the dropdown menu determines whose newsfeed and which newsletter your post is included in. You should select the one or more categories that best match the content of your post, so that it will reach the audience with the matching interest. For example, if your post is about insurance coverage, it will be relevant to the audience with the Business Management category of interest, or if it is about yeast, it will be relevant to the audience with the Winemaking category of interest.
Content Body: The WYSIWYG editor allows you to add text, links, images and embedded videos. The editor provides styling options that don’t require any coding knowledge, but you can also enter code view and edit the section’s html/css code.
Publish: When your post is ready, you can click the Publish button, and the post will immediately appear on your company page and in the newsfeed. You can also schedule the post for a set time by clicking on the Schedule button and selecting the date and time of publication before clicking the Publish button.
What to Post
Great content marketing focuses on your audience’s needs, not just your brand. Create content that solves problems, answers questions, or shares useful insights. Highlight your expertise and what sets you apart. Be authentic and informative, not overly promotional. Always ask: “What value does this give my audience?”—providing insights on your product or service can also be a service to those looking for solutions, and including a call to action can make the difference. Check out our News Content Best Practices.
When to Post
The WIN Product & Service Newsletter (PS News) goes out every two weeks, so if you post something every two weeks, your content will be included in every relevant edition of the newsletter. If you don’t have enough content to do that, we recommend that you try to publish a post once per month to keep your brand present in the WIN news stream. You can see the newsletter schedule and deadlines here, so that you can make sure you get your content posted ahead of the deadline for the edition newsletter you want it to be included in.
Additional Tips
Metrics: Your company page includes a metrics tab where you can see how each of your posts performed and where visitors to your company page came from. You can use these metrics to better understand what kind of content performs well for you, so you can continue to improve your marketing efforts.
WIN Account Manager: Your WIN account manager is here to help you with marketing advice and tech-support to get the most out of the WIN marketing platform and other relevant WIN marketing solutions. To take advantage of their expertise, let them know what your goals are and what’s happening at your company, so they can use that insight to help you utilize the marketing platform features and suggest other valuable opportunities.